A great pizza dough recipe
")
Ready for the oven
I was a bit ho-hum when pizza came up on the Fresh From the Oven baking challenge this month, but my youngest daughter was delighted. I usually use a recipe from Jamie Oliver’s Italy which works really well – otherwise, dare I say it, Pizza Express delivers cheaply and efficiently here in Dubai. Would this be a big improvement? The instructions were detailed – thanks to Lauren from Coffee Muffins – but I had a bit of trouble with ounces after so long with metric. I made a third of the quantity as some of the recent FFTO recipes have made gargantuan amounts. I used my Kitchenaid for the dough and it worked exactly as described. The dough is very soft – very unlike the springy Jamie version which can be an elastic devil to roll out.
Lauren warned us that the shaping of the dough was tricky and she was right. Even picking it up was difficult. I shaped it back into a ball and tried to balance it on my knuckles. After several tries I started to get the hang of it – working very quickly is the key. If I practised every day for a month I might make an even, circular pizza! I finished off by spreading with my fingers. The dough becomes very thin – almost transparent in places. I usually make a sauce by simmering tinned tomatoes with chopped garlic and a dried chilli for at least half an hour and then mash it with a stick blender.
-
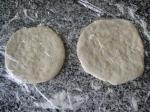
- Resting dough
-
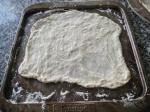
- Not very circular!
-
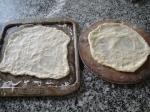
- I tried a baking tray and a pizza stone
-
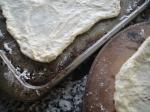
- Dough close up
-

- The dough seems to capture little bubbles of air
-
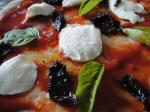
- Favourite simple toppings
-

- Ready for the oven
-
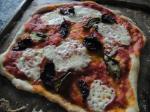
- Served hot, thin and crispy
For speed, this time I used passata, mozzarella and the some of the last basil from my garden (it’s getting too hot here now and the leaves are getting tough) plus some sun-dried tomatoes for my eldest who loves them. The dough stuck in places to the pizza stone but was absolutely fine on the baking tray. It was cooked quickly and devoured even quicker. My daughters asked for more but this made two smallish pizzas. I will make this again but use the cup measurements – it’s much easier than it looks and has an authentic quality about it. Even though the shape was homemade the pizzas resembled the ones you get in Italy – just the thing to transport me to the deli next to the Trevi fountain – oh for a wood-fired oven.
Here’s the recipe which comes from Peter Reinhart‘s The Bread Baker’s Apprentice (with lots of helpful hints from Lauren):
Pizza Napoletana
- 4 1/2 cups or 20.25 ounces (6.75 ounces) of unbleached high-gluten bread flour
- 1 3/4 teaspoons or 0.44 ounces (0.14 ounces) of salt
- 1 teaspoon or 0.11 ounces (1/3 tsp) of instant yeast (if using active dry yeast you will need to increase this by 25%)
- 1/4 cup or 2 ounces (0.67 ounces) of olive or vegetable oil, optional
- 1 3/4 cups or 14 ounces (4.67 ounces) of ice-cold water
Stir together the flour, salt and instant yeast in a large bowl. With a large metal spoon (I used a wooden spoon and it didn’t seem to make any difference) stir in the oil and water until all the flour is absorbed.
To do by hand, you need to stir with one hand and turn the bowl in the opposite direction with your other hand. You need to do this for 5 to 7 minutes, occasionally changing the direction as to really help develop the gluten. This method of mixing is actually quite a difficult task, sort of like rubbing your tummy while tapping your head, but as long as you are mixing the dough it should work out ok.
The next day a couple of hours before you want to cook them remove the dough from the fridge. Dust your counter with flour (and your hands) then spray oil on top. Place each ball on the counter and then gently press each into a flat disc about 1/2 inch thick. Top each with a little flour and oil and cover with another bag. Let rest for 2 hours.
At least 45 minutes before cooking put on your oven on at its maximum temperature (mine goes up to 250 oC, which worked ok) up to 800 F. If you have a baking stone put it in the oven now. If you don’t have a stone then you can use a normal baking sheet, just don’t preheat it first.
Now comes the tricky part to stretch out your dough, dust your peel or sheet pan with semolina flour or cornmeal. Coat your hands in flour including the backs and your knuckles. Gently lay the dough on to the top of your fists and carefully stretch it by bouncing the dough in a circular motion. As it starts to spread out you can move to the full toss method (flinging it above your head and hoping it doesn’t fall on the floor – good luck!). If it sticks to your hands at any point lay it out flat and redust your hands, continue stretching until it is the desired width.
Once you have reached the desired width place the stretched dough on the peel or baking sheet.
Now you can top it as you wish. I used a thin layer of tomato sauce, mozzarella, bacon and broccoli.
Now that your oven should have preheated, transfer the pizza to your oven. It should only take between 8 and 10 minutes to cook. You might want to turn it 180 degrees after 2 minutes, if you think it might over cook on one side.
Comments are closed.


Ahhh good idea, pizza baking session this bank holiday! I like the home made shape… By the way, what is a cup in mls or fluid oz? (I presume it’s a measure of volume) ta.
It’s a measure of volume. An American cup size is about 250ml – it doesn’t really matter as long as you are conisitent with your measures, it’s the proportions that are important. There is a very long post about cup measurements on Wikipedia http://en.wikipedia.org/wiki/Cup_%28volume%29 Have a lovely bank holiday.
Your pizza looks lovely 🙂
I also don’t like this cups and spoons measurement and always addapt them in grams. My scales measure in ounces too but I don’t have confidence in this thing too 🙂 I’m just as stuborn as a mule 🙂
I had an idea of shaping the pizzas as gondolas but it was a hard task so the circular pan was the easiest way.
I like the way your pizzas turned out!
I don’t think I’m a relaxed enough person to use cup measurements!
Hello, Sally. Your pizza looks beautiful. I am impressed that you stretched your dough in your hands. I took the easy way out and just pressed it onto the pans. You are right that it trapped bubbles and was very thin in parts. I made the full recipe and it made two big pizzas (one I made into garlic bread) that fed four people and we had leftovers.
could u plz tell me where can i get fresh yeast in Dubai. Thanx.
Hi Salma, You can get fresh yeast from the bakery section in Park n Shop on the Al Wasl road. Happy dough making.
This is my favorite recipe for crisp thin crust pizza. Your pizza looks incredible!
Hello Sally. What a great pizza recipe. Who doesn’t love pizza, right?
Thanks for visiting my blog. You gave me a chance to discover yours also.
Magda
Hi Sally
Wonder if you could help me, as I’ve been looking everywhere in Dubai for a dough scraper / cutter.
I see you mentioned one in your great looking recipe above and wondered if you knew where to get one in Dubai.
I’ve tried all the normal places but no luck.
Thanks
Hi Andy, I got mine in the UK but not sure where you would get one here. I just looked on the UK Lakeland website but can’t find one (good stockists for most things with a branch at Mirdif City Centre). Tavola might have one….but if not you might have to order one to be sent here. There is a professional kitchenware shop in The Courtyard Al Quoz that sometimes has the odd unusual item. Let me know how you get on.