It’s rye bread – but not as we know it
 How thrilling to be introduced to a bread making technique that I’ve never ever heard of and with an exotic Japanese name to boot. And no surprise that it should be ace bread-baking duo Sylvia and Ivan from Mushitza who not only shared the recipe but added their own bread baking experience and ideas for inspirational shapes for the loaf. They say ‘it’s the fluffiest bread we’ve ever made’.
However, I’m still in January healthy resolutions, hair-shirt mode and a fluffy, white loaf is way down the list of what I want to bake and eat. Would this method make a rye loaf fluffy (and therefore appealing to fussy, white-bread loving teens)? Only one way to find out.
")
The extra stage of making the tangzhong is not arduous at all. It’s a bit cold in Dubai at the moment and the rye gluten is not very strong so it took quite a long time to rise each time (in fact I shoved it in the fridge overnight for the first one). The result was a really tasty, great textured loaf. I bunged a few raisins in one of the swirls which went well with the sweet taste of the rye. I’m thinking apricots and rosemary in an all rye version next time. Oh yes, they’ll definitely be a next time.
Great with some strawberry conserve and butter. Excellent with paté and cornichons. Will it stay moist and fresh for a few days as claimed? It passed the teen test so I don’t think it will be around that long to find out.
If you have a stand-mixer with a dough hook, make this today. Trust me.
")
Tangzhong Rye Bread – Original from Christine’s Recipes, adapted by Mushitza, further adapted by me.
Printable version here.
Ingredients for the tangzhong
30 g strong bread flour
150 g (ml) cold water
Ingredients for the dough
200 g strong bread flour
150 g rye flour
5 g dried active yeast
55 g light brown sugar
5 g sea salt
1 egg
125 g (ml) milk
120 g tangzhong
30 g butter, melted and cooled
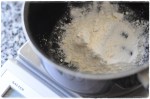
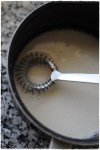
") First prepare the tangzhong. Whisk together the cold water and flour (there should be no lumps) and cook over low heat (stirring all the time) until the temperature reaches 65ºC or until the spoon you’re stirring with leaves a trace. The mixture should have the consistency of something between crème anglaise and pastry cream. Leave to cool down to room temperature.
First prepare the tangzhong. Whisk together the cold water and flour (there should be no lumps) and cook over low heat (stirring all the time) until the temperature reaches 65ºC or until the spoon you’re stirring with leaves a trace. The mixture should have the consistency of something between crème anglaise and pastry cream. Leave to cool down to room temperature.
To prepare the dough, warm the milk to blood temperature (20 seconds on high heat in the microwave works for me) and stir in the yeast until it’s dissolved. Combine the strong bread and rye flours, sugar and salt, then add the milk and yeast mixture, most of the tangzhong (120 g – leave the rest for glazing) and egg. Use your hand or stand mixer equipped with a dough hook to mix all the ingredients into a soft dough then add in the butter. Knead in the mixer for 15 – 20 minutes. The dough is ready when you can stretch it to a very thin membrane before it tears (try this with a small piece). Cover the bowl and leave it to double in size (this took about 2 hours in my cold house).
Knock the dough back on a lightly floured surface, give it a quick knead just to let the gas escape, then shape it as you like ( a loaf or small buns). The images show how to make it into a three-part loaf. Transfer to buttered loaf tin or a baking tray lined with baking paper if making rolls or a free-form loaf. Cover with plastic wrap and let it double in bulk again (another 2 hours for me).
Preheat the oven to 180ºC. Brush with milk (as I did) or the rest of the tangzhong and bake for around 30 – 35 minutes until nicely golden.
Click on an image to enlarge and scroll through the gallery.
-
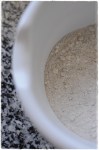
- Weigh the flour for the tangzhong (in the pan saves washing up)
-
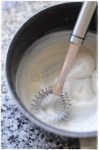
- Add the water and whisk out any lumps
-
- Cook the tangzhong until your spoon leaves a trace
-
- Weigh the rye and strong flours
-
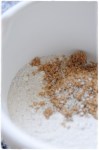
- Add the sugar and salt
-

- Next add an egg, the tangzhong and the yeast mixture. Combine using the dough hook on slow, then add the butter
-
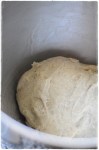
- Knead for 15 – 20 minutes until a smooth dough is reached
-
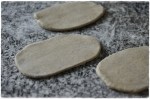
- Gently knock back the dough after rising and roll into three flat ovals
-
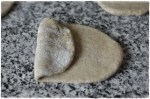
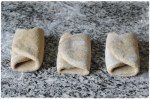
- Fold the ends over each other
-
- Each oval of dough will be a third of the size
-
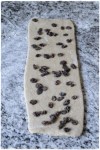
- Use a rolling pin to flatten each piece to a long strip. You can add a flavour at this point too.
-
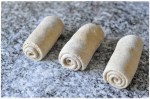
- Roll up each piece of dough
-
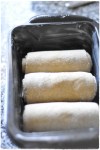
- Place the pieces, seam-side down, into a buttered loaf tin
-
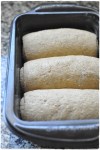
- Leave to prove until doubled in size
-
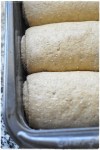
- Ready for the oven
This was a Fresh From the Oven challenge so you can see how everyone else got on with tangzhong if you pop over there. It’s the very last round-up on the site but we’ll still be baking every month. I’ll let you know the details next time.
Have I tempted you to try tangzhong?
Trackbacks
Comments are closed.


I have heard of tangzhong bread before and have been meaning to give it a try. I’m sold!
Your loaves look delicious and I love the fact that you’ve added rye flour, makes them so much healthier.
Thanks, Sally.
Magda
These look wonderful…very appealing indeed. I have only recently been able to find rye flour in my corner of Mexico and now I have a perfect way to use it!
Once again, a fabulous post that reminds me of my teenage years when I was obsessed with mastering breads and pastries – from foccacia to swedish tea rings to croissants that took me the whole day to make. You inspire me to have a go again – thank you!
T.
These look amazing – what an inspired idea to include the rye flour! I’ve failed to get involved with FFTO this month, but am definitely gearing up for February 🙂
Pretty loaves! Surely delicious too.
Cheers,
Rosa
Very intersting technique and gorgeous outcome, they look like cinnamon rolls!
The loaves look divine. i missed this chance to make these because I had too many things going on. Love your take with the rye. A beautiful bread,indeed.
I love rye bread but never have thought to try it the tangzhong way. Your variations always amaze me.
I love the light of the photos. Just gorgeous!
You’ve enchanted and educated me in one! How clever you are, Sally…..
That is a new technique to me, and very intriguing! Thanks for the step by step photos, Sally!
Your rye bread looks wonderful!, and you also did a great job with the tutorial – very helpful!
I’ve know this method for quite a while. I bake lots of challahs (Jewish bread) and sometime use this method – your can an example here
http://winnish.blogspot.com/2011/08/blog-post.html
This is a fabulous post, your step by steps are great. I love how beautiful the rolled loaves look…this is a must try.
Brilliant idea to use Rye flour Sally! I really loved this loaf, it’ll definitely be making lots more appearances very soon
Cold in Dubai?…hmmm…I just checked the weather forecast…21 degrees c forecast for tomorrow…cold?!…
Your bread looks great! Nice idea to try rye flour!
How interesting that you roll the loaves yet the interior is so even in it’s crumb! A lovely bread.
The photos are gorgeous……I had rye flour once. Did nothing with it! You make it looks and sound easy and incredibly tempting though I’ve promised myself to make your zucchini bread first! Stay well
This looks wonderful! Just read about the workshop you and Meeta are organizing in Dubai. What an amazing idea – truly wish I could join you. I’ve taken a year break from blogging but will be relaunching the blog with a new name and home this spring. Just love to follow along your blog – good luck with the workshop!
This looks delicious – have added to my must make bread challenge.
This looks delish! I love the smell of fresh bread in the house. You’ve got me thinking I would like to make some now, but I haven’t got enough butter in the house. I just might brave the sandstorm outside to go to the store to get some!
Brilliant post Sally. Love the step by step pics x
Each month you blow me away with what you do for the challenge – well done 🙂
Beautiful Sally, lovely photos too. It was seeing this that made me promise to myself that I’d get back on the FFTO program.
oh they look like chelsea buns on one side! Nice pictures Sally 🙂
Now that is one recipe I am definitely trying, they look fantastic and so mouth watering! Love the sounds of raisin with rye, yum Sally!
I absolutely love fresh homemade bread and it sounds the like the perfect accompaniment to your Goulash Soup recipe which also sounds amazing. Beautiful site. Look forward to seeing more posts.
Excellent step-by-step pictures! I love rye bread a lot!
MMMM,…!
As it happens, I have a bunch of rye flour on hand. Maybe this is what I’ll do this afternoon… I’ve got some pâté in the fridg! Thanks, Sally.
Oh – pâté. Now you’re talking.
Awesome, do you have cup measures for home cooks? Thanks.
Hi April – I’ll try and do a conversion. I always use scales and don’t like cooking with volume measurements, but each to their own. I know that some people are the other way round. Bear with me 🙂
The bread looks amazing. Love the spiral pattern in. Just a note that “tangzhong” is actually Mandarin Chinese, from Yvonne Chen’s famous 65C Bread Doctor book which was originally published in Taiwan. However it is originally a well-known Japanese technique for baking bread, called “Yukone” (the kanji characters are the same in both languages, so “tangzhong” is merely the Chinese pronunciation of the Japanese term). 🙂
That’s so interesting. I was listening to the BBC Food programme yesterday on the challenges that people in Japan are having with their food chain since the nuclear accident.
Your bread recipes are very inspiring! 🙂