How to shoot your food
 That person with a camera permanently glued to their face, that woman wobbling on a chair on her tip toes to take an overhead shot of a bagel, that shopper who comes back from the market and lays all her veg out on a bit of old sacking, that Mum who asks her teen to wait one minute while she clicks her sandwich with an iPhone. Guilty as charged – I am that person.
Having been asked a few times about the equipment I use and the courses, workshops and help I’ve used to help improve my food photography, while I am certainly no expert, this post is about some of the steps on my journey. Starting out with a point and click, to having food shots featured in magazines…. so some of this has worked. However, it IS a journey and I’m still climbing up the first footpath with mountain peaks ahead in the distant mist.
Before food blogging (BFB) did I see everything as a potential still life and have the urge to capture it? Well yes and no. There’s a wooden blanket box in my house packed full of photos going back over decades including some ‘artistic’ shots of some onion seed heads taken with my first camera when I was about 14. There’s always some sort of creative thread running through my life whether writing, painting, drawing, photography or cooking (yes chopping an onion does count as creative in my book – I have very Zen-like thoughts while doing it). A very dear Aunt of mine always took masses of photos at family events although hated being in front of the lens; in her eighties, she still carries on (using a manual Olympus SLR and film) and at some point I started to emulate her.


When I started blogging, it was very much about the writing side but like many before me, I soon found that my adored Sony Cybershot on food mode was not helping me tell the whole story. I wanted food pics that made people feel hungry at the very least, and at best make them feel like reaching in and taking a huge bite.
In my teens I used to puzzle over a pocket manual of photography to try to work out aperture, ISO and all those good things, now there is a simply massive wealth of great stuff out there. I’ve just put together a food photography and styling page with all the resources I recommend online and offline, here in Dubai and beyond. (image)
These are the major stepping-stones on my own personal journey; if you are just starting out or wanting to take better pics (of food or otherwise) this might give some inspiration. Also, photographic equipment is still an expensive investment and advise online can be very confusing. I’m finally beginning to know why some things work well and why not when they don’t (still with me?!):


Learn to use your camera
I was terrified of my brand new DSLR for at least six months and then the wonderful Zahra Jewanjee (hosting a course at Dubai Ladies Club) taught me how to make friends with it and how to use every last little button and feature. I’m a ‘read the manual’ person but with something as complex as a camera this isn’t enough. This course is the best thing I ever did and would recommend finding one in your area as soon as you first buy a camera.
Food photography workshops
Spending time with people who take food pics for a living has given me a few ‘ah hah’ moments. They do certain things instinctively which defies explanation on the page. By watching how other people work I’ve started to be more confident in my own style. My inspiration came from:
Béatrice Peltre at Food Blogger Connect 2011; lovely Ellen Silverman (she shot Gwyneth Paltrow’s book) at Food Blogger Connect 2012 and in Dubai; brilliant David Griffen (also at Food Blogger Connect 2012) who is totally down to earth yet takes heavenly pics; a smart phone workshop at Gulf Photo Plus with Matt Armendariz who is super friendly and practical; and through my three collaborations with Meeta K Wolff – a whirlwind of energy and inspiration. Members of Fooderati Arabia have also been super supportive (thanks especially to Arva, Sarah and Sukaina). By watching how other people work I’ve started to be more confident in my own style. If you get the chance to hang out with a pro food photographer, seize the opportunity.


Kit
Photography has become much more accessible but is still not without expense. This is what’s in my camera bag and elsewhere that I’ve acquired on the way:
Camera bag
Carrying your kit around safely is important; when choosing a camera bag I’d recommend something that has room for your bits and pieces so you don’t have to juggle carrying a handbag. I bought this from Grand Stores Digital at Mall of the Emirates in Dubai. It has padded sections inside so I can carry my camera and two additional lenses. It’s not the most stylish accessory ever so this one from Ona is on my wish list. For more inspiration visit Kelly Moore and Jill E in the US and Cosy Cameras in the UK.


Camera
I always over-spec when I buy something new, but think I got the balance just right with my Nikon D5000 DSLR (the newest version the D5300 is double in megapixels, has wifi and GPS). It’s more compact than its big brother the D90 with most of the same features. I must admit to using the hi-definition video camera that’s built in very rarely. As a versatile camera for all sorts of situations it’s been fantastic. I did a lot of agonizing about Nikon vs Canon before buying; Canon does seems to be the most popular choice of food bloggers and many professionals but there are many fans of both brands. You could drive yourself crazy reading all the comparison charts. One advantage is if you buy another Nikon (unless it’s a full frame) you can always use your old lenses.
Don’t feel pressured into buying a DSLR though. The options for taking great pictures increase every day. I was at a talk this week about the Nokia Lumia 1020 smart phone which has a 41 megapixel camera sensor – perfect for taking images in dark restaurants unobtrusively and making videos. Your final choice should be based on what you are going to use your camera for most.


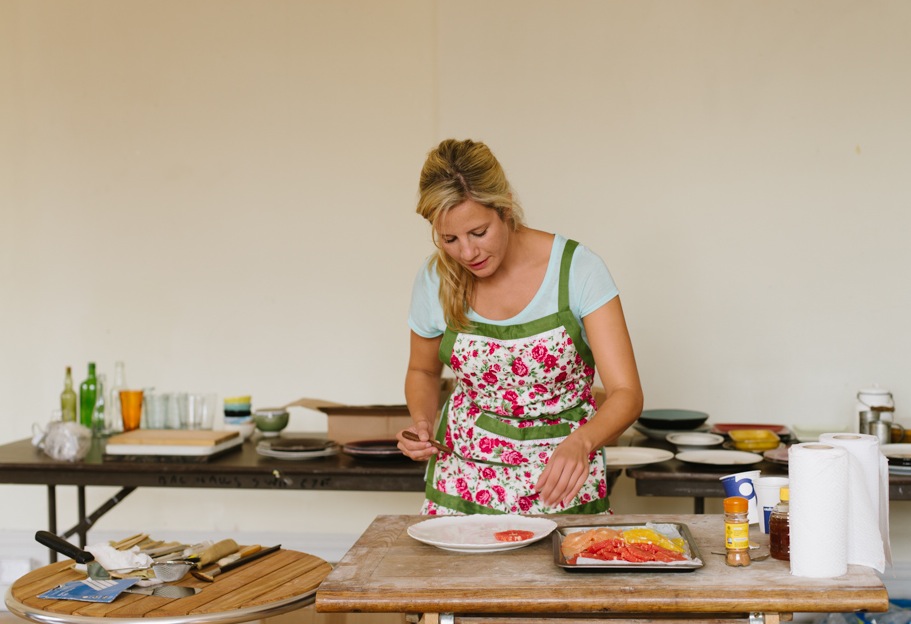
Pics above taken on iphone.
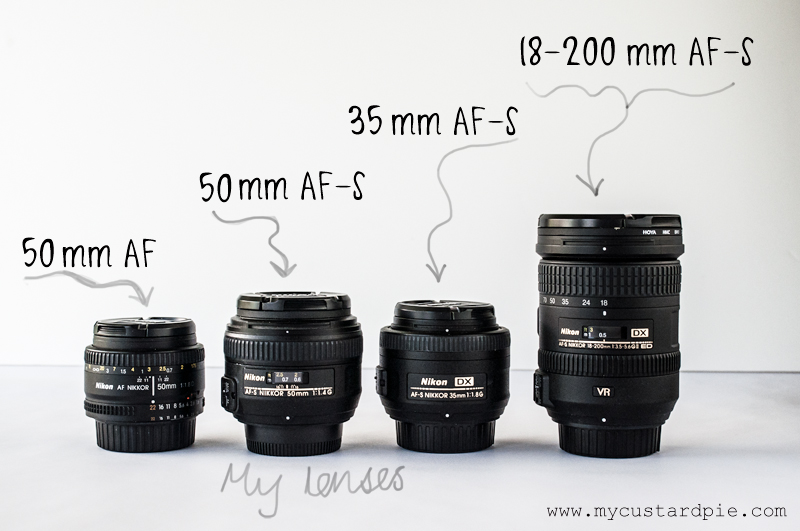
Lenses
The Nikkor AFS DX 18-55 mm f/3.5-5.6G VR lens that came with the camera is fine but I wanted something that gave me a shallower depth of field (that lovely blurred background look). I bought a Nikkor AF 50mm f/1.8D which is great used on a tripod but doesn’t have a motor in the body of the lens (and there isn’t one in my camera) so manual focus is necessary (a dot in within the viewing panel shows when you are in focus). Last year I invested in a Nikkor AF-S 50mm f/1.4G which is a dream and helps me achieve pinpoint focal points and soft blurry backgrounds.
My Nikkor AF-S DX 35mm f/1.8G Lens was bought in a happy accident. I dropped my camera in the middle of a farmyard while in the UK and the ring chipped on my kit lens (I bought a new bayonet mount ring and had it repaired in Dubai). The 35 mm is very reasonably priced and I’ve come to love it especially for travel and walking. It’s very light to carry and the wide-angle is fantastic for the English countryside. Both the 50mm and 35mm are fixed or prime lenses. They don’t zoom so if you want to get a close up you have to walk nearer to the subject (and vice versa).
My most recent and (most expensive purchase) is a Nikkor AF-S DX 18-200 mm f/3.5-5.6G ED VR II which I bought to give me more flexibility when out and about – I must say I’m still getting used to it.
For UV filter, colour balance and to protect the lens I bought a Hoya filter for each of my lenses and keep them attached permanently.
 Making Nice in the Mid-West author Mandi wrote this really informative post about Prime lenses and focal length.
Reflectors
A reflector can be anything that reflects light and are used to fill in areas that look too dark in a food shot. I bought this early on and now know I should have got one with a white side instead of the gold side. The handle is great for angling reflected light onto the area you want. I also use white or black (to absorb light) foam core and white card.


Tripod
Using something to reflect the light and a tripod are the two things that transformed my shots. Buy the sturdiest one you can was Zara’s advice and my Benro tripod kit has served me well but now I’d like something more substantial. A Manfrotto 055 XPROB tripod legs with a 322RC2 ballhead and accessory arm, so I can do overhead shots more easily, is on my wish list.


Food styling
Some people can use many food props with abandon. Meeta and my new, super-talented friend Rowena from Apron and Sneakers are excellent at this. When I try to do this it looks too contrived and ‘less is more’ suits me best; Smitten Kitchen did a whole cook book without props after all. Getting the food to look it’s absolute best is paramount and tips learned from wonderful, kind, creative Fiona Archibold here in Dubai, and charming Emily Jonzen at Food Blogger Connect have stood me in good stead. I only use tips that will keep the food edible; I don’t cook for photographs, I cook for my family. Here are a few:
- Keep an array of fresh herbs in a plastic container lined with damp kitchen roll
- Have a water spray on hand, especially to invigorate leafy greens (which I should have used on that pear above!!)
- Only dress a salad at the very last minute – paint it on the leaves with a brush
- Arrange spaghetti from a height, let it coil down onto the plate
- Oil is your friend – brush on oil to light-catching surfaces to make it look appetizing


 Props
Props
I love kitchen shops so an excuse to buy all sorts of things from market stalls to kitchen equipment stores “it’ll be good for food photography” was easy. However, I’ve made a decision, as my blog is about food cooked in my home, I’m going to use the surfaces available like my dining table and the kitchen surfaces. I use what’s in my cupboards and don’t go out and buy things specially for a shoot. Never, say never but…. In the meantime, I’ve accrued a fair assortment of stuff for that purpose including a pile of napkins and tea towels which I buy in the sales. Dishes tend to be on the small side – it’s easier to shoot and to make things look generous. Having said that if you are propping with cutlery, this needs to be in proportion. Car boot sales and markets in the UK have been the best hunting ground for cutlery.
Natural props are my favourite and I like using the ingredients pertinent to the dish. I always remember the advice from my Prue Leith book about ‘simple with elaborate’ and ‘keep it relevant’.
Hunting grounds are everywhere but in Dubai: Daiso, Crate and Barrel (sale), Tavola, Lakeland, Pottery Barn (sale), Little Luxuries (Town Centre Mall) and of course Dragon Mart (if you can stand to lose hours of your life!). Elsewhere I love Tavistock Pannier Market and wish I’d taken an extra bag for the flea market in Tbilisi, Georgia.
If KP reads this he’ll realise exactly what Is in all the cupboards – gulp!


Lightroom (and Photoshop)
I wish I’d bought Lightroom along with my camera. It’s a fantastic tool for organising your pics as well as brilliant post-processing. If you can use your camera (see above) you can use Lightroom. I was given Photoshop but it’s not intuitive. I have to Google all the time as I forget how to do things. The beauty of Lightroom is that it also works with Photoshop as it’s Adobe. You can edit in Lightroom then open the image in Photoshop (for instance for adding text to an image) but save a copy back into Lightroom. This gives it the edge over Apple’s Aperture for me. (Adobe CS2 suite is available for free download from Adobe – thanks to Gavin on Twitter for this).
Hard drives
Backing up your work, especially your images, is a chore ….but vital. A photographer I know downloads the images from her camera (via Lightroom) onto two external hard drives. When they are full, she labels them and keeps them in a safe; it’s her valuable work after all. Another friend never reuses a memory card and keeps them. I use external hard drives – Seagate are very affordable although you have to format them for Mac which is a bit fiddly.
Books
As an avid reader, I confess to very few books on photography. I bought Nikon D5000 from Snapshots to Great Shots by Jeff Revell along with my camera. A lot of it went over my head; my advice would be to take a really good beginner course (as above). Food photography – from snapshots to great shots by Nicole S Young is very practical and has some detailed instructions about editing in Photoshop too (I also follow her blog here) although aimed more at professional photography. It has many example called ‘poring over the picture’ where she tells you how an effect was achieved. Her style is precise and detailed. Plate to Pixel by Helene Dujardin (of Tartelette blog fame) was much anticipated. It covers the basics of your camera, natural light, artificial light, composition, set up, styling and a bit of post-production. There are some beautifully inspiring pics with lots of showing step by step set up pics or before and after. I find the writing style a bit wordy but it’s a useful resource.


Lighting
To now I’ve shot with natural light only. Yes it would be handy to have a soft box or some Lowel Ego lights …. but for now that can wait.
So that’s a bit about my photography journey – how about you?
What does photography mean to you? Who is your favourite food photographer? Would you read a food blog without pictures? Have you any advice about getting started or improving your photography?
For more links and resources visit my food photography page:

Comments are closed.


Invaluable tips Sally! I have a similar post sitting in draft – I can’t seem to bring myself to hit publish as I learn something new almost every day! This week I spent two hours with a pro photographer – not a food one – simply a friend who shoots weddings and kids normally, but she came to my home and we worked in the area that I usually take my food photos in. This was the key – learning in your own environment in a similar light to what you are used to. And although I’d still like to take a photography course, this was money well spent. We also went through my lightroom process, so there were some extra hints and tips to pick up there in terms of workflow. So, three and a half years into the blog and I finally learnt how to use my camera in manual mode! Until then, I’d be relying on auto mode (although I was able to adjust my aperture/F stop) and taking accidentally decent photos. I actually now understand a lot more about our camera and feel more in control of adjusting aperture, ISO and shutter speed and finding the right combination of all three. We are also Nikon fans, we started with a D50 and then up until recently we had a D300, but we recently upgraded to a full frame D610 and we’re very happy with it. It means many of our lenses now need an upgrade…but we’re hoping to trade in. Agree with the 50mm and 35mm being great for food, as well as a light reflector, a tripod and possibly an infrared remote – though I’ve yet to make the jump to shooting tethered, as I saw Beatrice do during the workshop at FBC a couple of years ago. Anyway, this is a really wonderful post for any budding photographer or blogger looking to improve their snaps. Golden rule – shoot in natural light when possible!
Thanks for such a thoughtful comment Ren. I must start to shoot tethered more. It would decrease the amount of shots I take and help me to trash the ones I don’t like as I go along.
I use Aperture and Shutterspeed priorities mostly but should make an effort to shoot in manual when at home using the tripod.
I don’t know where you find the time Mrs P, photography is important for me and my site but its no huge issue, if I didn’t get a half decent shot I would publish the review without images.
It IS time consuming! Harder to take good shots in restaurants – especially as so many are really dark!
I too am that person hovering above tables. Last weekend I even fell off a chair while aiming for an airial shot. A really interesting, informative post with some really great advice. I must say I’ve become rather lazy about developing further my food photography skills since I bought my incredibly forgiving AF-S Nikkor 35mm lens (I see you have this lens too). I then use Photoshop Elements to tweak and it’s done and dusted.
I love hearing what other people use – and love that 35 mm lens too but don’t use it so much for food photography. I’ve got a post coming up soon all about looking into other people’s camera bags – there’s more than one way to crack a nut!
Fantastic and well-thought out post. I haven’t really made the time needed to improve my photography skills. I have couple of books that I have half-heartedly skimmed through – most of it going over my head. I really should make time to either do what Ren did and get a pro in to my house and help me with the really weird light I have up here in my woods-shaded Edinburgh home (argh!!), or do a course. Online courses don’t tempt me: I’m an old-fashioned girl. Still using a Nikon D3000 from years ago, with just the one prime lens – AFS-Nikkor 35mm 1.8 – but would love to upgrade. Your ‘journey’ has given me much to contemplate – and save for. I have a rubbish tripod and don’t use it so must amend that as I am sure that one step will vastly improve things as I’ don’t have steady hands when on tip-toe, 🙂 Thank you so much Sally for this most timely and well-written post!
I have different issues with light here in Dubai. There is a lot of it but it changes direction quickly. Also we have huge windows (not good for getting directional light) and all have a blue filter on them. During the cooler months I open the window but it would steam the camera up and wilt all the food now! Thanks for such a lovely comment. Get a good tripod, you won’t look back…..although your pics are gorgeous already.
Totally thought this was going to be about shooting pheasants, wicked post though, dead useful 😉
Ha ha ha – just loading up my shotgun now!
Wow, this post is so thorough and extremely helpful so thank you so much! 🙂 I am a young food blogger and as my blog expands the quality of my photographs gets really important- this post has been invaluable! 🙂
http://fromayoungfoodie.wordpress.com
It’s a fun journey Sarah – thanks for the nice comment….and good luck. Love the Lemon & Strawberry Victoria Sponge recipe.
What a brilliant post Sally! I am on the hunt for a decent camera bag but they are frightfully expensive here so don’t want to make the wrong choice.
Have a beautiful and happy week ahead.
🙂 Mandy xo
This one was inexpensive and has served me well. Saving up for that Ona one now though….eeek
A well-written post. Oh, I need one of those bags; so practical…
Cheers,
Rosa
Thanks Rosa – there are some lovely ones around. Love to know what kit you use.
A very helpful post, Sally and so interesting to see some of your journey too. I am still using my iPhone to take photos. At first, after I read everything ever published on how to take decent smartphone photos, I was really happy with how well they were turning out but now I am getting more and more frustrated with the limitations…my blog which started last year as a place to record my favourite recipes for my son, has become much more than that so I think I need to make that leap and get a proper camera. I love scouring the markets, charity shops, lifestyle stores like Anthopologie and eBay for napkins, tea towels, small plates and bowls and cutlery…I shall certainly refer back to this post when I start researching cameras! Thanks for taking the time to put this together!
Using a smart phone can be liberating too. I love my iphone and there are some amazing apps out there. What do you use?
I use Snapseed to crop and adjust exposure, contrast and to blur and I use fotor to add text and collage the tutorials. I used to shoot using camera+ but prefer using the iPhone camera. Do you use any apps when you use your phone?
What can I say? Thanking you will not be enough for compiling this post Sally. It’s such an elaborate post – a big help for all of us.
And I loved where you have said ‘I don’t cook for my photographs, I cook for my family’.
Thanks Ishita – my ‘what’s in the camera bag’ post coming soon too. We can all learn from each other. On that cooking for my family note – I think it’s important to remember why we do things ….easy to get carried away!
These posts are invaluable for sure.
I feel so encouraged and appreciative when a foodie is so generous with their knowledge, so thank you so much Sally.
Your bit about cameras is something I am bookmarking, I really need to spend more time getting better acquainted with my camera. Although I’m sure my pictures have improved over the months I know that there is plenty more work to do! I agree with Kellie, I think Ren’s idea of getting a friend in-the-know into the house is fabulous xx
Food blogger are generous Deena (as demonstrated by your lovely comments) – and I’ve be fortunate to learn from so many people. Getting to know the best light in your house is invaluable.
A great post Sally. Very useful tips and reminded me that I’ve become a bit lax about back ups. I love Plate To Pixel, full of really helpful information in an easy to use format. GG
I am obsessed by backing up – but wish I’d organised it all from the start with Lightroom. My files are all over the place….argh!
Great post. I have very similar equipment and follow the KISS principle when it comes to light, styling etc. Last year I bought a small point and shoot to fill the gap between the phone and the D90, a lightweight Canon G15 which has an amazing light meter and a great lens. It’s size and weight, plus the high res monitor have greatly increased my flexibility with shooting angles and positions. I just love Snapseed for processing!
I LOVE Snapseed on my iphone. And as for the lightweight option, as many people have said (and I subscribe to) the best camera you have is the one you have on you. Much more likely if it’s easy to carry 🙂
Great post! I have had the Nikon D3000 for a few years but I’m looking to upgrade to the D5300.
I use the polystyrene sheet that came with our TV as our light reflector and everything else is a hodgepodge of found objects that serve a purpose.
I always try to shoot in natural light but in winter (here in New Zealand) there is no natural light before or after work which means I don’t blog during the week.
Do you think the Nikkor AF-S 50mm f/1.4G is worth it? I have the Nikkor AF-S 35mm f/1.8G which I use 99% of the time and thought about upgrading to the 1.4 but it’s about 7-10 times the price. Is it a good investment or could I spend $1500 on something else?
I do love the 50mm 1.4 – my friend has the Sigma version though and that’s more cost effective. Let me find out the details for you. She takes amazing pics (The Hedonista).
Oh, I will check out the Sigma for sure then. I just had another look at the 35mm f1.4 and it’s more than double what I would pay for a new camera!
I know – I was given some birthday money by my Mum! Sarah uses the sigma 50mm f1.4 and takes amazing pics.
Oh golly – the Sigma is more on Amazon.
Nice, thank you for this especially the lenses bit. Going shopping lol
No one tells you that the lens bit is the expensive bit!!
I still don’t have the budget for a real camera but at least now I’ve made my mind up about which brand. Thanks for sharing this vital information Sally 🙂
Whichever brand you choose you’ll be OK Tandy. It’s a big investment but I’ve never looked back. It’s a hobby I love.
What a great post Sally. Thanks for sharing some of your hard earned knowledge – as we all know, this blogging thing is a steep learning curve.
Thanks – far from being an expert and still making lots of mistakes, but I find I always learn better from people who have got there the hard way rather than people who do things instinctively! So hope this helps.
Thanks for sharing all of this Sally, it is a great post, one that I am going to read again to absorb all the information. Plate to Pixel is my go to book as well. I have to admit that I am still struggling when it comes to using manual mode and it is on my list of “smart goals” for this quarter:) Your post and the links will be of great help.
Ah SMART goals – it’s on my to do list for my blogs to use SMART goals!!
Well done…lots of good information there.
Wow, so many things to learn from here. I am still taking baby steps, it is a very informative post for me.
Thank you so much for sharing this brilliant post. I found this very useful indeed as I am soon to be buying my first DSLR Camera and it is such a Confusing step to make. A new world out there!!
It is confusing. Ask as many people you admire as you can – that worked for me.
Interesting post, I was using my phone for a while and then am now on my point and shoot, eventually need to upgrade I suppose but am overwhelmed by the cost. Gulp.
Very well written post and gives me quite a sense of deja vu. I also have similar books, props, thought process, though I currently own only one lens and I haven’t done a food photography workshop with anyone yet. It’s on the wishlist though. All the best Sally. 🙂
Thanks for the advice – it’s not that easy to take a picture in which you can recognise the food your have just prepared, never mind imagine all the flavours!
So true!
A really helpful post Sally. I have a Nikon D3000 and have a book (struggled to read). I have to take many of my photos with poor lighting as I work long hours but have a decent tripod. I admit to using my smartphone frequently & editing via iPad as it sometimes just seems too hard otherwise! I will definitely get a reflector! I am inspired to get out my camera book and work out what all those numbers & settings mean… Thank you!
I struggled with my book about my camera too – I must go back to it and work out why. I think whatever works for you is best…. using a smartphone can be liberating. Knowing how to use your camera is well worth it though…
I have been compiling a post like this since forever! Great job in getting it done Sally.
Yes it DID take forever too Kari. Thanks for your input for the follow up which is on its way …..sooon-ish!
Sally, what an interesting post! I’ve just reread it, and there’s so much to absorb. My photography is so basic compared to this – most of the time I use a fixed lens Panasonic Lumix balanced on an inverted water jug under the kitchen skylight. 🙂 Reflectors are a great idea – a photographer I know once told me that white polyethalene chopping boards are great for this. I’m almost embarrassed to admit that I never travel with my “big” camera when I’m out at restaurants and markets – all the photos come from the iPhone! 🙂 You’ve inspired me – it might be time to start thinking about things more seriously… thanks.. xx
I rarely take my big camera out to restaurants unless at a blogger event. I’d rather take my iphone for some more unobtrusive pics. I love how you’ve described your photography set up – I can picture it now 🙂
Salli, I’ve read this post a few times on my way to work this week. SO much great information there. I’ve enjoyed your journey so much – you are such an inspiration! Your photos are beautiful and a testament to all the hard work you put into them. Bookmarked this for reading again and again!
Mardi – I’m a bit overwhelmed by this comment – you are too kind. Lovely to hear from you.
What an informative post Sally? So kind of you to share so many invaluable tips. I’am pinning this so that I can read it over and over. Thank you. xx
What an informative post Sally!*
Thanks so much 🙂
Great tips, thanks. I will archive this information for the time I purchase a real camera. Always keep meaning to buy one, but life gets in the way. Meanwhile I try to be as creative as I can on my blog with my compact digital and Iphone – and my bedside lamp hanging off my left arm.
I think the line between cameras is now blurred and there’s no such thing as a proper camera to get the result you want. This post from Pink Ronnie about an alternative to a DSLR is great reading http://pinkronnie.com/2014/02/my-visual-voice-2/
Thanks Sally, I’ll have a read of the link you posted. The thing I find frustrating is the lack of depth of field with the compact/iphone. I’ve started making collage backdrops for my blog post stories and a little more ‘grunt’ would be good
This is so helpful, Sally! Thank you for sharing this to us! ❤
I so related to this post, having taken many of the same steps as you and still feeling that I’m on the first footpath!
I enjoyed every bits of advice. It just happened that my laptop is dying and I was looking to upgrade my tools. Your advice was the easiest to understand and the most useful. It’s an endless investment but if the joy is great, why not? First, I guess I need a good blog platform and a goal to start with. Thank you.
…ah yes, blog platform is a whole other topic. Glad this was useful and thanks for kind comment.
Thanks for all these great tips, very useful too! But when I make something, I want to eat it directly & don’t want to take many pictures before devouring it! 😉
Really helpful. I have been on the hunt for a used Canon on ebay for a while. I really want better quality pics on my site, but for now my iPhone pics will have to do.